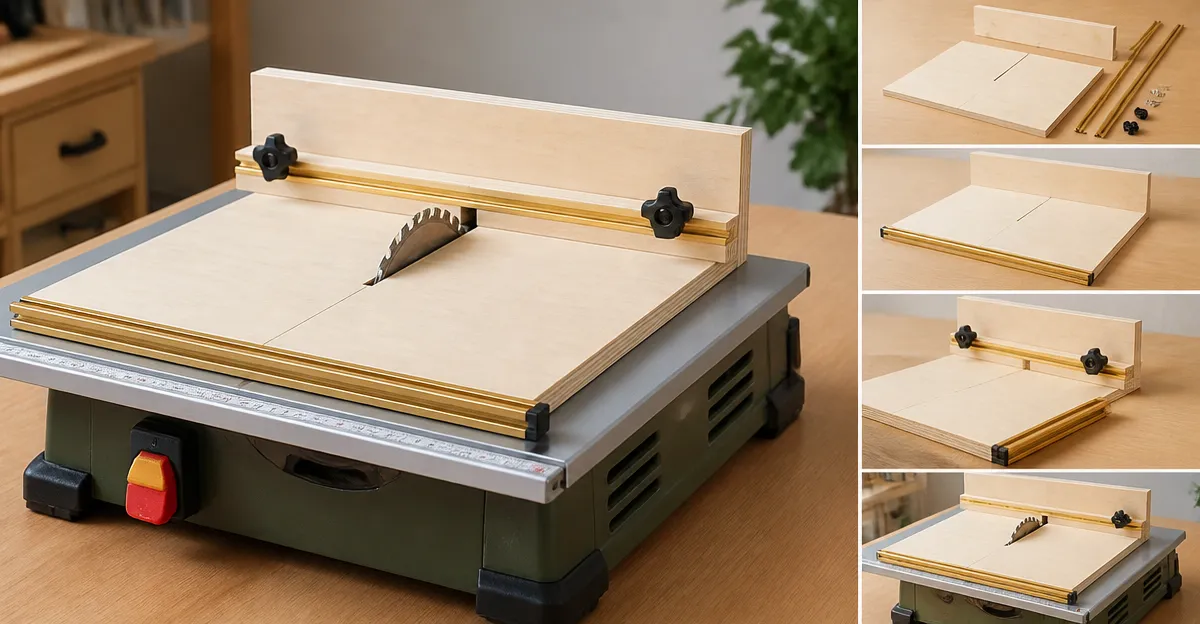
How to Build a Crosscut Sled for a Mini Table Saw: Step‑by‑Step DIY Guide for Accurate, Safe Cuts
Introduction
In this guide the reader will learn how to design and assemble a reliable crosscut sled that fits a mini table saw. The process emphasizes accuracy, repeatability, and safety, allowing the woodworker to achieve professional‑grade cuts without expensive commercial jigs. By following each stage the reader will understand why certain components improve performance and how to avoid common pitfalls. The result is a versatile sled that can be used for a wide range of projects, from small trim work to precise panel cuts.
What You’ll Need
The following materials and tools are recommended. Many items are available as complete kits, which simplify the build and ensure proper fit for standard 3/8" × 3/4" miter slots.
- Base material (½" MDF or plywood) – provides a stable platform.
- Aluminum or extruded fence – creates a straight reference edge.
- Miter bar and T‑tracks – guide the sled along the saw table.
- Hold‑down clamp and flip stop – keep the workpiece secure and protect the operator.
- Low‑friction tape or UHMW strip – reduces wear and enables smooth sliding.
- Basic hand tools (screwdriver, Allen key, measuring square, pencil).
- Optional accessories such as the POWERTEC Crosscut Sled Kit, Rockler Small Parts Crosscut Sled, Fulton MDF Crosscut Sled, or Catcan Crosscut Sled Kit for ready‑made components.
Step 1 – Measure and Cut the Base
Begin by measuring the distance between the saw blade and the rear fence of the mini table saw. Mark a rectangle on ½" MDF that is slightly larger than the saw’s throat opening, typically 12" × 10" for a compact unit. Use a table saw or circular saw to cut the base to size, ensuring the edges are square. A precisely cut base creates a zero‑clearance surface that reduces tear‑out and improves cut quality.
If the builder prefers a pre‑engineered solution, the POWERTEC Crosscut Sled Kit includes a melamine‑coated MDF base sized 23‑13/16" × 23‑13/16" that is ready to install, saving time on layout and finishing.
Step 2 – Install the Fence Face
Attach a fence face to the front edge of the base using the supplied screws or wood glue. The fence should be flush with the base and extend the full width of the sled. A straight fence provides a reliable reference for measuring and aligning workpieces. For added durability, the POWERTEC kit supplies an extruded aluminum fence that resists warping and offers a smooth riding surface.
Alternatively, the Rockler Small Parts Crosscut Sled uses a compact plastic fence that is lightweight and suitable for small‑part cutting, though it may not provide the same rigidity as aluminum.
Step 3 – Fit the Miter Bar and T‑Tracks
Select a miter bar that matches the saw’s 3/8" × 3/4" slot dimensions. Insert the bar into the slot and secure it with the provided set screws. The bar serves as the primary guide, keeping the sled parallel to the blade during each cut. Low‑friction T‑tracks, such as the 12" aluminum tracks included in the Catcan Crosscut Sled Kit, can be mounted on the underside of the base to allow the sled to glide smoothly across the table.
The Fulton sled also provides adjustable aluminum tracks that fit most standard slots, offering flexibility for different saw models.
Step 4 – Apply Low‑Friction Surface
Apply a strip of low‑friction tape or UHMW polyethylene to the underside of the base where it contacts the saw table. This reduces wear on both the sled and the saw surface, and it prevents the sled from binding during operation. The POWERTEC kit includes wear‑resistant low‑friction tape that is pre‑cut for easy installation. The Catcan kit supplies UHMW miter bars that inherently provide a smooth sliding surface without additional tape.
Step 5 – Install the Hold‑Down Clamp and Flip Stop
Position the hold‑down clamp near the rear of the sled, aligning it with the blade’s cutting line. Tighten the clamp so that it presses the workpiece firmly against the fence without distorting the base. The flip stop, which is part of the POWERTEC and Rockler kits, prevents the workpiece from slipping forward after the cut, protecting the operator’s hands from the blade. Ensure the stop is adjustable so that it can be set for different material thicknesses.
Step 6 – Add Measurement Graduations
For repeatable cuts, mark the base with clear graduations. The POWERTEC sled features ½° engraved graduations that are easy to read and remain visible after extensive use. If building from scratch, use a permanent marker or a fine‑line ruler to etch measurements at regular intervals (e.g., every 1/8"). Accurate markings eliminate the need for a separate measuring device and speed up the workflow.
Step 7 – Test Fit and Adjust
Place the assembled sled on the table saw and slide it back and forth to verify smooth movement. Check that the miter bar remains centered in the slot and that the fence does not wobble. If the sled binds, adjust the low‑friction tape or reposition the T‑tracks. Perform a test cut on a scrap piece of wood, measuring the result with a calibrated square. Fine‑tune the adjustable stop and clamp until the cut is square and the workpiece remains stable.
Tips & Pro Tips
- Always wear eye protection and keep hands behind the fence or clamp when the blade is rotating.
- Use a high‑quality square to set the 90° stop; this ensures that every cut is truly perpendicular.
- When cutting thin or delicate pieces, add a sacrificial backing board to protect the workpiece from tear‑out.
- For maximum rigidity, consider reinforcing the MDF base with a thin layer of birch plywood, especially when cutting larger panels.
- Regularly clean the low‑friction tape or UHMW surface to prevent dust buildup that could cause friction.
Troubleshooting
Problem: The sled does not slide smoothly.
Solution: Verify that the low‑friction tape is fully adhered and that the T‑tracks are not warped. Replace worn tape with fresh UHMW strips if necessary.
Problem: The workpiece moves during the cut.
Solution: Increase clamp pressure and ensure the flip stop is engaged. Check that the fence is perfectly vertical using a combination square.
Problem: The cut is not square.
Solution: Re‑calibrate the 90° stop, and confirm that the miter bar is seated correctly in the saw slot. Small adjustments to the bar’s set screws often correct alignment issues.
Conclusion
This guide has demonstrated how to build a crosscut sled that delivers accurate, safe cuts on a mini table saw. By measuring carefully, selecting appropriate components, and following each assembly step, the woodworker creates a tool that enhances productivity and reduces the risk of injury. Whether the builder chooses a complete kit such as the POWERTEC or Rockler models, or assembles a custom sled using individual parts, the principles remain the same: a stable base, a straight fence, a reliable guide, and secure clamping. The reader is encouraged to apply these techniques to future projects and to explore additional accessories that further improve precision.
Products Mentioned in This Guide
Frequently Asked Questions
What material should I use for the base of a mini table saw crosscut sled?
A ½‑inch MDF or plywood sheet works best because it provides a flat, stable platform while being easy to cut and drill.
How can I make sure the sled fits standard 3/8" × 3/4" miter slots?
Cut the sled’s underside to the exact width of the slots and use a miter bar with matching T‑tracks to lock it in place.
Why is an aluminum or extruded fence recommended for the sled?
Metal fences stay perfectly straight and resist wear, giving a reliable reference edge for accurate crosscuts.
What safety features are essential on a crosscut sled?
Include a hold‑down clamp to secure the workpiece and a flip stop to prevent the sled from moving toward the blade during cuts.
Can low‑friction tape replace UHMW on the sled’s sliding surface?
Yes, low‑friction tape provides a smooth ride and is a cost‑effective alternative to UHMW, though UHMW lasts longer under heavy use.