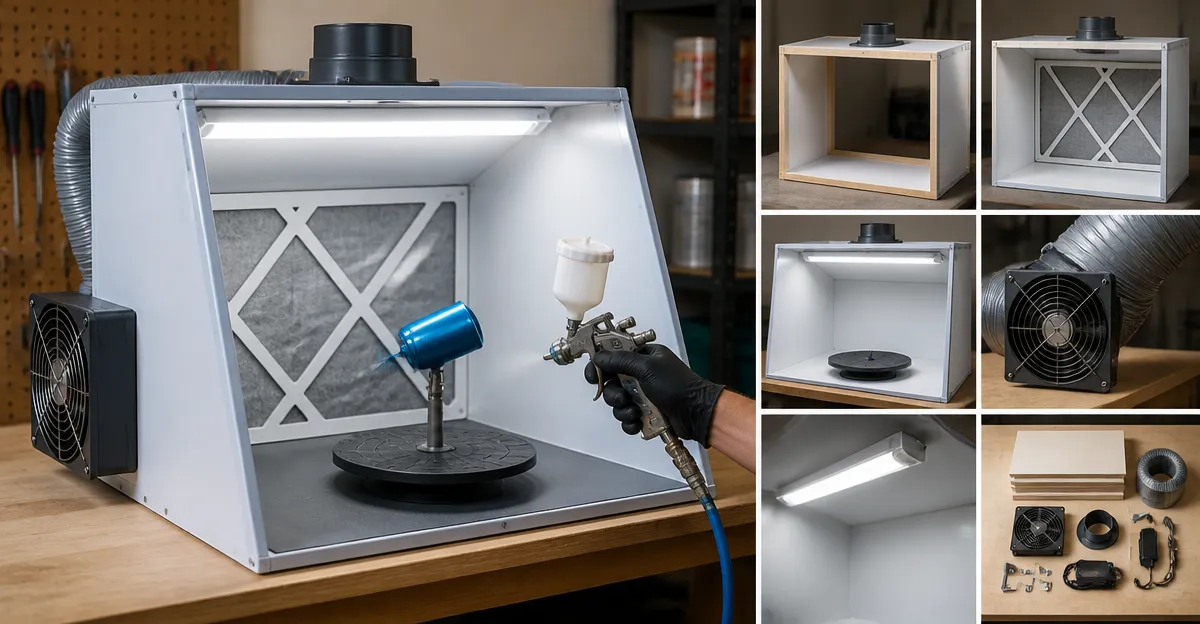
How to Build a Compact Spray Booth for Small Workshops: Step‑by‑Step DIY Setup, Ventilation & Safety Tips
Introduction
Creating a controlled environment for airbrushing, spray painting, or finishing projects is essential for both health and quality. This guide will teach the reader how to assemble a compact spray booth that fits on a workbench, provides reliable ventilation, and includes proper lighting. By following the instructions, one can protect against harmful fumes, prevent overspray on surrounding surfaces, and achieve professional‑grade results without investing in a large permanent structure. The information is valuable for hobbyists, makers, and small‑shop owners who need a portable solution that can be stored when not in use.
What You'll Need
- Portable spray booth (e.g., Master Airbrush Spray Booth or Master Airbrush Dual Fan Spray Booth)
- Optional lightweight shelter for larger projects (Wagner Small Spray Shelter or Wagner Large Spray Shelter)
- High‑capacity exhaust fan or blower (VEVOR Air Mover Blower Fan)
- Flexible ducting (included with most booths, optional extra length)
- Safety equipment: respirator, gloves, eye protection
- Basic tools: screwdriver, zip ties, measuring tape
Step‑by‑Step Instructions
1. Select an Appropriate Location
Choose a well‑ventilated area that can accommodate the booth dimensions while allowing space for the exhaust hose to exit the room. A workbench near a window or an external wall simplifies duct routing. Ensure the floor is stable; a non‑slip mat can prevent the booth from shifting during operation. Position the booth away from open flames or heat sources, as many airbrush paints are flammable.
2. Assemble the Portable Booth
Unbox the Master Airbrush Spray Booth and follow the quick‑setup instructions. The unit weighs only 7.5 lb, making it easy to lift onto a bench. Connect the 7.5‑inch revolving turntable, then attach the LED illumination panel; the bright LED eliminates shadows and reveals fine details. For larger projects, the Master Airbrush Dual Fan Spray Booth offers dual exhaust fans and four built‑in LEDs, providing even brighter coverage and stronger airflow. Both models feature a replaceable fiberglass filter that captures overspray particles, protecting both the user and the environment.
Why these products are useful: the single‑fan model supplies 6.1 CFM of airflow at a low 60 dB noise level, ideal for quiet home workshops. The dual‑fan version delivers 5.2 m³/min (approximately 110 CFM) for faster fume removal when working with high‑VOC paints. Their portable frames can be disassembled into a carrying case, allowing storage in a closet or garage when not in use.
3. Install Ventilation Using a Dedicated Exhaust
While the built‑in fans provide basic airflow, adding a high‑capacity blower such as the VEVOR Air Mover Blower Fan dramatically improves fume extraction. Position the blower outside the booth, connecting its inlet to the booth’s exhaust port with the supplied flexible duct. The VEVOR unit moves 3,198 CFM, ensuring that even strong solvent vapors are expelled quickly. Secure the duct with zip ties to prevent leaks, and route the opposite end of the duct to a window or door gap using the 1‑inch adaptor that comes with the Master Airbrush booths.
Why this product is useful: its 585 W motor provides industrial‑grade airflow while remaining portable, thanks to a built‑in handle and rubber feet. The IP44 rating protects it from moisture, making it safe for use in basements or garages where humidity can be higher. Users have praised its durability and ability to run for several hours without overheating, which is essential for long painting sessions.
4. Optimize Lighting for Precision Work
The integrated LED lights on both Master Airbrush booths deliver uniform illumination, but additional lighting may be required for larger shelters. If you opt for a Wagner Small Spray Shelter or the Wagner Large Spray Shelter, consider mounting a clamp‑on LED work light inside the tent to eliminate shadows. Position the light at a 45‑degree angle to the workpiece; this reduces glare and reveals surface imperfections before spraying.
Why these shelters are useful: they are made of translucent fabric, allowing natural light to filter through while still containing overspray. The small shelter fits comfortably on a tabletop, whereas the large shelter (9' W × 6' D × 5.5' H) can accommodate furniture pieces or larger art objects. Both include a rear vent that can be paired with a fan or the VEVOR blower for enhanced airflow.
5. Set Up Safety Measures
Even with excellent ventilation, a high‑quality respirator is mandatory when working with solvent‑based paints or lacquers. Choose a half‑mask respirator with organic vapor cartridges, and ensure a proper seal around the nose and mouth. Wear chemical‑resistant gloves and safety glasses to protect skin and eyes from splatter.
Before each session, inspect the booth’s filter; a clogged filter reduces airflow and may cause fumes to recirculate. Replace the fiberglass filter according to the manufacturer’s recommendations or when visual inspection shows saturation. Keep a fire extinguisher rated for Class B (flammable liquids) nearby, and never leave the booth unattended while the blower is operating.
6. Perform a Test Run and Calibration
With the booth assembled, ventilation connected, and safety gear on, conduct a short test spray using water‑based paint. Observe the airflow by holding a lightweight piece of tissue near the exhaust; it should be drawn steadily toward the vent. Verify that the LED lighting provides even coverage without hot spots. Adjust the turntable speed if the paint is not reaching all angles, and fine‑tune the blower speed to balance noise and extraction efficiency.
Document the optimal settings for future reference: blower speed (low, medium, high), fan power, and LED brightness. Maintaining a log helps replicate successful results and reduces trial‑and‑error for subsequent projects.
Tips & Pro Tips
- Seal all gaps. Use painter's tape around the exhaust hose entry point to prevent fugitive fumes from escaping into the room.
- Extend the exhaust hose. The Master Airbrush booth includes a 7‑foot flexible hose; if additional length is needed, splice with a compatible hose coupler.
- Power flexibility. The Master Airbrush units operate on 12 V DC, allowing connection to a portable battery pack for field work where wall outlets are unavailable.
- Maintain filter health. A clean filter not only improves airflow but also extends the life of the blower motor by reducing strain.
- Temperature control. In hot climates, place the blower near a window to exhaust warm air outside, keeping the workshop comfortable.
Troubleshooting
| Problem | Possible Cause | Solution |
|---|---|---|
| Weak suction, fumes linger | Clogged filter or duct blockage | Replace the fiberglass filter and inspect the duct for kinks; re‑secure with zip ties. |
| Excessive noise | Blower operating at maximum speed | Reduce blower setting to medium; add rubber vibration pads under the blower base. |
| Uneven lighting | LED panel too close to workpiece | Adjust LED height or add a diffusing sheet to soften shadows. |
| Booth collapses during use | Improper assembly of shelter poles | Re‑assemble following the sewn‑in instructions; replace any damaged bungee cords. |
Conclusion
By following this guide, the reader can construct a compact, efficient spray booth that safeguards health, improves paint quality, and fits within limited workshop space. The combination of a portable booth, a powerful VEVOR blower, and proper safety equipment creates a versatile system suitable for 3D‑printed models, hobby figurines, small furniture refinishing, and even cake decorating. Maintaining the booth through regular filter changes and routine checks ensures long‑term performance. One can now enjoy professional‑grade results without the expense or footprint of a permanent installation.
Products Mentioned in This Guide
Frequently Asked Questions
What size spray booth is suitable for a workbench?
A compact booth that fits within a 2‑ft by 4‑ft footprint works well on most standard workbenches.
How do I ensure proper ventilation in a DIY spray booth?
Install a dual‑fan system with an exhaust hose that vents to the outside, maintaining at least 100 CFM per square foot of booth area.
Do I need special lighting inside a small spray booth?
Use a bright, heat‑resistant LED panel mounted above the work area to eliminate shadows and improve finish quality.
What safety gear is required when using a portable spray booth?
Wear a respirator rated for organic vapors, safety glasses, gloves, and ensure the booth is grounded to prevent static discharge.
Can the spray booth be stored when not in use?
Yes, choose a fold‑able or modular design that can be disassembled and stored in a closet or under a workbench.