How to Install and Tune a Mini Table Saw Splitter: Step-by-Step Setup, Alignment & Safety Tips
Introduction
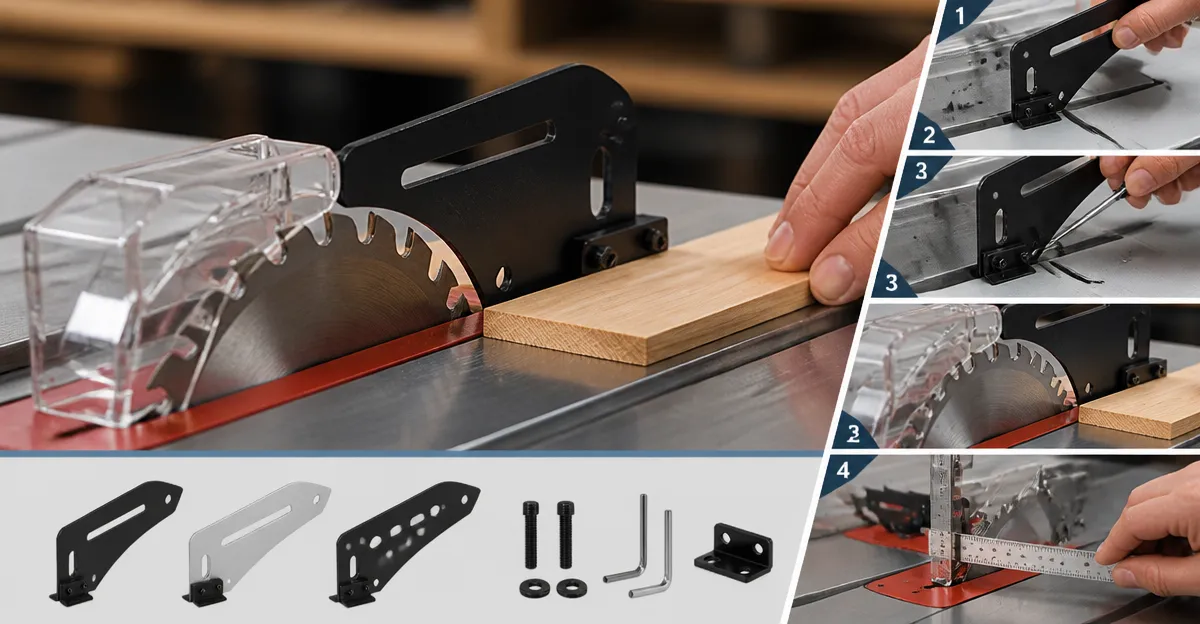
In this guide one will learn how to install a mini table saw splitter, align it precisely, and apply safety best practices. A properly installed splitter reduces kickback, improves edge quality, and protects the operator from hazardous incidents. Whether the saw is a vintage model without a riving knife or a modern unit with a zero‑clearance insert, the techniques described here apply to a wide range of tabletop and contractor saws.
The article combines practical instructions with product recommendations drawn from proven accessories. By following each step one can achieve a reliable, low‑maintenance solution that enhances confidence during rip cuts of hardwood, plywood, or soft‑wood stock.
What You'll Need
- A table saw equipped with a zero‑clearance insert or throat plate.
- Drill press or handheld drill with a 3/16" drill bit (plastic‑grade for phenolic inserts).
- Measuring tools such as a digital caliper and a straightedge.
- Safety equipment: push block, safety glasses, hearing protection.
- One of the following splitter kits, depending on blade kerf size:
- MicroJig Thin Kerf Splitter – $26.99, 4.5 stars.
- MicroJig Full Kerf Splitter – $39.00, 4.3 stars.
- MicroJig Thin Kerf Steel Pro Splitter – $39.00, 4.3 stars.
- MicroJig 1/8" Saw Blade Splitter – $26.99, 4.2 stars.
- DWE7485 Riving Knife Replacement – $23.65, 4.7 stars.
Step 1: Verify Blade Compatibility and Choose the Correct Splitter
Determine whether the saw uses a thin‑kerf (approximately 3/32") or a full‑kerf blade (approximately 1/8"). The thin‑kerf models such as the MicroJig Thin Kerf Splitter are engineered for 3/32" blades and feature mini‑featherboard technology that applies steady lateral pressure. For full‑kerf blades the MicroJig Full Kerf Splitter provides offset options (0.000", 0.003", 0.006", 0.009") to match the wider kerf.
If the saw originally shipped with a riving knife that is missing or damaged, the DWE7485 Riving Knife Replacement is an OEM‑compatible option for DeWalt DWE7485 models. However, many older saws lack the mounting geometry for a standard riving knife, making a splitter the more versatile choice.
Step 2: Prepare the Zero‑Clearance Insert
Remove the existing insert and clean any debris. Inspect the insert material: wood, MDF, or phenolic plastic. For phenolic plates, use a dedicated 3/16" plastic drill bit; the standard bit included with most splitter kits is optimized for wood and may cause chatter on plastic.
Mark the intended splitter locations using a digital caliper. The splitter’s built‑in Kerf Keepers require a clearance of approximately 0.118"–0.145" from the blade edge. Align the marks so that the splitters sit symmetrically on either side of the blade, maintaining a uniform gap.
Step 3: Drill the Mounting Holes
Secure the insert to a sturdy workbench. Using the precision drill guide supplied with the chosen splitter kit, position the guide over the first marked location. The guide registers off the kerf, ensuring that the hole is centered relative to the blade path.
Drill a pilot hole to the depth specified in the instructions (typically 1/4" for wood inserts). For phenolic inserts, drill slowly and withdraw the bit frequently to prevent overheating. If the guide includes a drill bit storage compartment, keep the bit handy for the remaining holes.
Step 4: Install the Splitters and Kerf Keepers
Insert the splitters into the freshly drilled holes. The thin‑kerf splitters feature a polycarbonate body reinforced with a stainless‑steel core, providing durability while remaining lightweight. Press each splitter firmly until it seats flush with the insert surface.
Attach the Kerf Keepers onto the splitters as illustrated in the product manual. The Keepers automatically eject if the workpiece attempts to close the kerf, offering an additional layer of kickback protection. The full‑kerf kit includes four Keepers with a range suitable for hardwood stress scenarios.
Step 5: Adjust Offsets for Optimal Fit
For full‑kerf splitters, select the offset that best matches the blade’s kerf width. Begin with the 0.003" offset and run a test cut on a scrap piece of plywood. Observe the gap between the cut and the splitter; if the kerf closes, increase the offset by 0.003" increments until the cut remains open throughout the pass.
Thin‑kerf splitters have a fixed offset but include mini‑featherboard pressure that pushes the stock toward the fence, reducing burn and improving edge quality. Verify that the featherboard pressure is sufficient by gently feeding a test board; the stock should glide smoothly without excessive resistance.
Step 6: Verify Fence Parallelism and Blade Alignment
Before making production cuts, confirm that the saw fence is parallel to the blade within a tolerance of 0.001". Use a straightedge and a feeler gauge to measure the distance at the front and rear of the blade. Adjust the fence as needed; an out‑of‑parallel fence can cause the splitter to bind, defeating its safety purpose.
Check blade alignment by measuring the distance from the blade tip to the fence at the top and bottom of the blade. Correct any tilt using the saw’s tramming adjustment. Proper alignment ensures that the splitter maintains a consistent gap along the entire cut length.
Step 7: Perform a Test Cut and Fine‑Tune
Place a sacrificial board on the saw table, engage a push block, and make a slow rip cut. Observe the interaction between the workpiece, splitter, and Kerf Keepers. The cut should remain open, and the wood should stay firmly against the fence without excessive friction.
If the wood shows signs of binding or the splitter contacts the blade, loosen the splitters slightly or re‑drill the mounting holes to a more appropriate offset. The goal is a clean, burn‑free edge with no tendency for the kerf to close.
Tips & Pro Tips
- Use a push block. A dedicated push block such as the GRR‑RIPPER 3D Pushblock works in concert with the splitter to keep long stock under control.
- Maintain a clean throat plate. Dust and resin buildup can alter the splitter’s seating depth, leading to inconsistent performance.
- Replace worn splitters. Polycarbonate can develop micro‑cracks after heavy use; inspect the splitters periodically and replace them to retain safety margins.
- Document hole locations. Mark the drilled holes with a permanent marker so that future reinstallations are repeatable.
- Consider a dual‑splitter setup. For very thick hardwood, installing two splitters on either side of the blade (as provided in the full‑kerf kit) offers redundant protection.
Troubleshooting
| Problem | Possible Cause | Solution |
|---|---|---|
| Splitters bind against the fence | Fence not parallel or offset too small | Adjust fence parallelism and increase splitter offset by 0.003". |
| Kerf Keepers do not eject | Incorrect keeper size for blade kerf | Swap to a keeper with a larger kerf range (0.145"). |
| Excessive wood burning | Insufficient featherboard pressure | Install the thin‑kerf splitter which provides built‑in mini‑featherboard action. |
| Drill holes are misaligned | Guide not seated correctly | Re‑position the drill guide using the kerf registration notch and re‑drill. |
Conclusion
By following the steps outlined above one can install and tune a mini table saw splitter with confidence. The splitter maintains an open kerf, reduces kickback, and improves edge quality, thereby extending the life of both the blade and the workpiece. Whether one selects the thin‑kerf model for 3/32" blades, the full‑kerf system for larger blades, or the 1/8" blade splitter for legacy saws, the fundamental principles of alignment, offset adjustment, and fence parallelism remain the same. Implementing these safety measures will result in cleaner cuts, safer operation, and greater productivity in any woodworking shop.
Products Mentioned in This Guide
Frequently Asked Questions
Why should I install a mini table saw splitter?
A splitter reduces kickback, improves cut edge quality, and adds a safety barrier between the blade and the operator.
What tools are required to install a mini splitter?
You need a drill (press or handheld) with a 3/16" plastic‑grade bit, a digital caliper or straightedge, and basic safety gear.
Can a splitter be used on a saw with a zero‑clearance insert?
Yes, the splitter fits most tabletop and contractor saws that have a zero‑clearance insert or throat plate.
How do I align the splitter for optimal performance?
Measure the blade’s kerf with a caliper, drill the mounting holes at the same distance, and tighten the splitter so it sits flush with the insert without wobble.
What safety equipment should I wear when installing the splitter?
Always use push blocks, safety glasses, and hearing protection while installing and operating the saw.