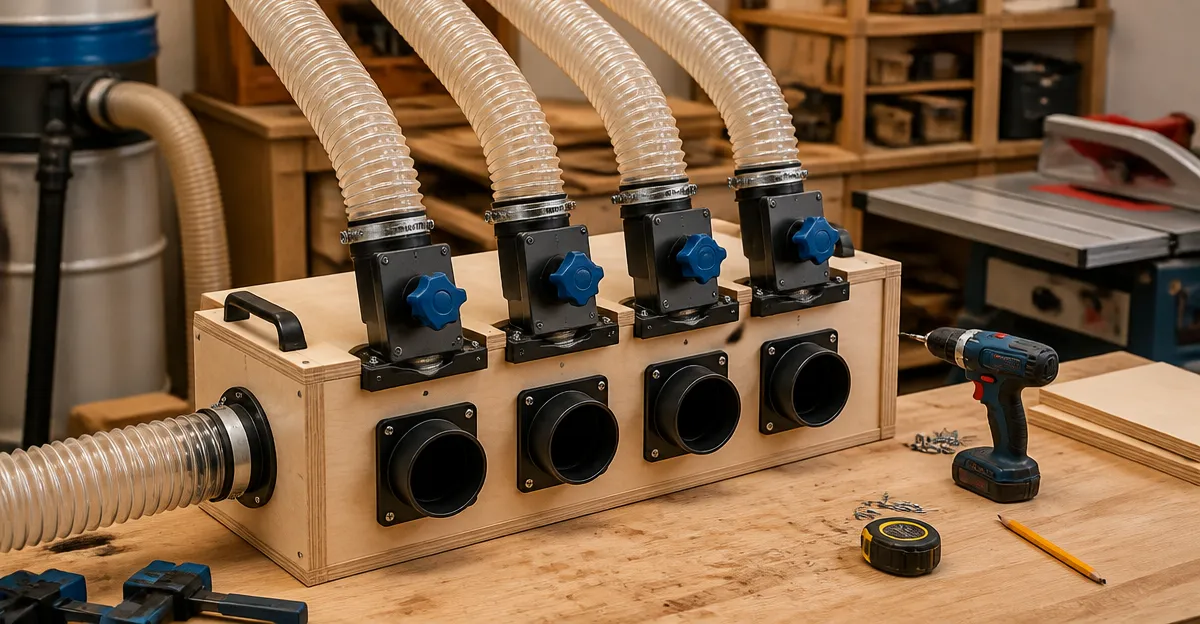
Introduction
In a compact workshop, efficient dust collection can make the difference between a clean environment and a hazardous one. This guide explains how to construct a portable blast gate manifold that directs airflow to any machine with minimal effort. One will learn to select appropriate blast gates, cut and assemble ducting, and achieve reliable suction without permanent installation. The result is a versatile system that enhances safety and productivity for small shops.
What You'll Need
- Two to four POWERTEC 4-Inch Blast Gate 2-Pack (depending on the number of tools)
- One POWERTEC 4-Inch Blast Gate for a heavy‑duty option
- Flexible 4" dust collection hose or rigid PVC pipe
- Hose clamps compatible with 4" ID hose
- Power drill, screwdriver set, and a measuring tape
- Optional: Rockler Dust Right 4" Blast Gate for wall mounting
Step 1: Plan the Manifold Layout
The first task is to sketch a layout that places a blast gate in front of each machine that will use the dust collector. One should arrange the gates in a star configuration so that each branch returns to a central manifold pipe. This arrangement reduces the length of hose required and balances pressure across the system. By planning the positions, one can determine the exact number of blast gates needed and where the portable frame will sit.
Step 2: Cut and Prepare Ducting
Measure the distance from each machine to the central manifold and cut the 4" flexible hose accordingly. It is advisable to cut a little longer than required to allow for minor adjustments during assembly. After cutting, secure each hose end with a hose clamp to prevent leaks. The clamps work with the 4" ID hose specified by all POWERTEC blast gates, ensuring a tight, air‑proof connection.
Step 3: Install the Blast Gates
Attach a blast gate to the end of each hose branch before it reaches the machine. The POWERTEC 4-Inch Blast Gate 2-Pack offers a tapered outer diameter that fits both 3.875" to 4.125" openings, providing a clog‑resistant, gapless seal. Its heavy‑duty ABS plastic construction absorbs impact and resists scratches, which is valuable in a mobile setup. For the most demanding tool, such as a table saw, the POWERTEC 4-Inch Blast Gate with aluminum body and steel sliding gate delivers superior durability and a locking stop to keep the gate aligned under high suction. Each gate should be installed with the embossed "OUT" marking facing the dust collector to guarantee proper airflow direction and to avoid clogging.
Step 4: Connect to the Dust Collector
Join all hose branches to a short length of rigid PVC pipe that serves as the central manifold. The PVC pipe should have a 4" inlet that matches the dust collector’s outlet. Secure the pipe to the collector with a clamp and verify that the connection is airtight. Then, attach the opposite end of the manifold to the portable frame using brackets or clamps, allowing the entire assembly to be moved as a single unit. The POWERTEC 4-Inch Blast Gate priced at $8.59 provides an economical option for additional branches when budget constraints exist.
Step 5: Test, Adjust, and Secure
Power on the dust collector and close all blast gates except the one feeding the machine you intend to test. Observe the suction at the open gate; it should be strong and free of air leaks. Open additional gates one at a time, noting any drop in performance, and adjust hose lengths or clamp tightness as needed. For a permanent wall‑mounted solution, the Rockler Dust Right 4" Blast Gate includes an integral bracket that mounts securely, keeping the gate stable during repeated use. Once all gates operate smoothly, secure the portable frame with wheels or a handle for easy relocation.
Tips & Pro Tips
- Label each blast gate with the name of the machine it serves; this reduces confusion during quick tool changes.
- Regularly clean the sliding groove of each gate to prevent debris buildup that can cause the gate to stick.
- Use a short length of flexible hose between the gate and the machine to minimize airflow resistance.
- Consider adding a quick‑release hose clamp for faster disassembly when the manifold needs to be stored.
- When mounting on a wall, ensure the bracket is anchored into studs to support the weight of the gate and hose.
Troubleshooting
Problem: Airflow is weak even with a gate open.
Solution: Verify that all hose clamps are tight and that no hose is kinked. Check the “OUT” orientation on each gate; an incorrect orientation can cause back‑pressure and reduce suction.
Problem: A blast gate sticks when closing.
Solution: Remove the gate and clear dust from the sliding groove using a soft brush. The anti‑clog design of the POWERTEC gates helps, but regular maintenance is essential.
Conclusion
By following this step‑by‑step guide, one can construct a portable blast gate manifold that delivers reliable dust collection for a small workshop. The selected POWERTEC gates provide clog‑resistant performance, while the Rockler gate offers convenient wall mounting. A well‑designed manifold improves air quality, protects equipment, and enhances overall efficiency. One is encouraged to adapt the design to personal workflow and enjoy a cleaner, safer woodworking environment.
Frequently Asked Questions
What is a portable blast gate manifold and why is it useful in a small shop?
It is a movable dust‑collection hub that routes suction to any tool, keeping the workspace clean without permanent ductwork.
How many blast gates do I need for a typical four‑tool setup?
Two to four 4‑inch blast gates are recommended, depending on how many machines you want to connect simultaneously.
Can I use flexible hose instead of rigid PVC pipe for the manifold?
Yes, 4‑inch flexible dust‑collection hose works fine as long as you secure it with proper clamps.
What tools are required to assemble the portable blast gate system?
A power drill, screwdriver set, measuring tape, and hose clamps are sufficient for the build.
How do I maintain optimal suction after installing the manifold?
Regularly check hose connections for leaks, clean or replace filters, and ensure blast gates close fully when not in use.