How to Build a Space‑Saving DIY Fold‑Down Benchtop for Small Workshops — Step‑by‑Step Plans & Materials
Introduction
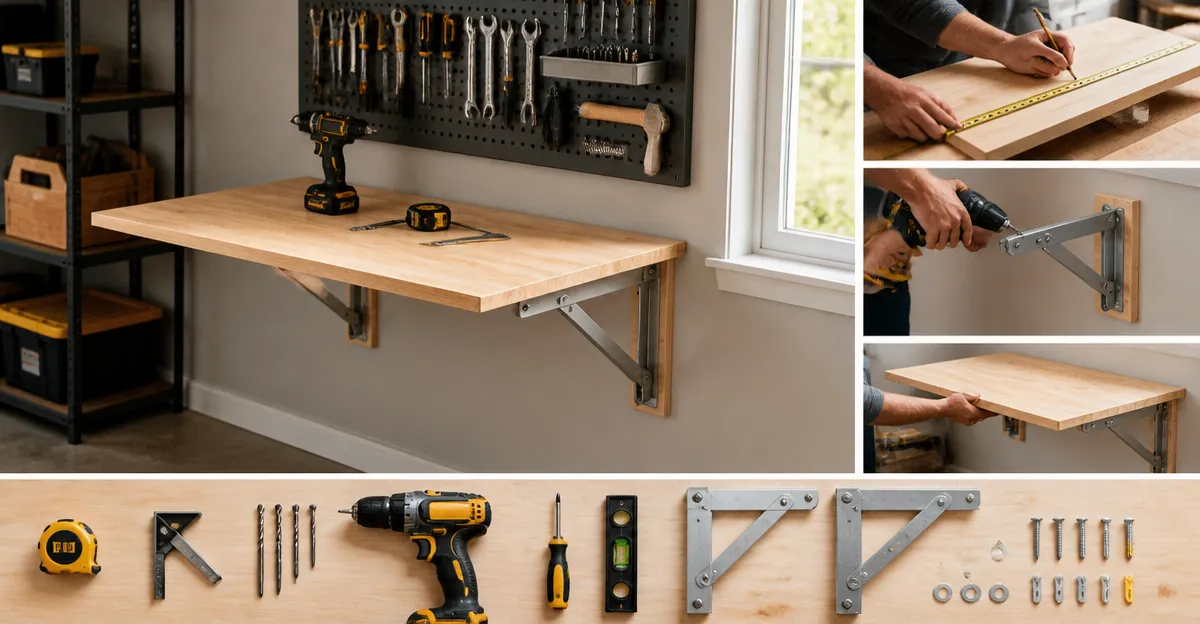
One often discovers that a limited workshop footprint hampers productivity, especially when multiple projects compete for the same surface area. This guide explains how to design and construct a fold‑down benchtop that occupies minimal floor space while providing a sturdy work surface when needed. Readers will learn to select appropriate materials, integrate folding hardware, and add power access points, resulting in a versatile station that can be stowed against a wall after use. The methods described rely on common carpentry tools and optional Amazon‑sourced products that simplify assembly without compromising quality.
The solution presented balances portability, load capacity, and ergonomic considerations. By following the step‑by‑step instructions, one can complete the project within a weekend, even with limited prior experience. The final benchtop will support heavy tools, accommodate power strips, and include optional storage drawers, making it suitable for hobbyists, DIY enthusiasts, and small‑business owners alike.
What You’ll Need
- 2×4×48 in. hardwood or plywood sheet (minimum 3/4 in. thickness)
- 2×4×48 in. 2×4 steel angle brackets (for frame reinforcement)
- Heavy‑duty hinge set (minimum 150‑lb rating)
- Locking latch or magnetic catch
- Four 1‑in. carriage bolts, washers, and nuts
- Power strip with surge protection (optional)
- Measuring tape, carpenter’s square, pencil, and level
- Drill, circular saw, and sandpaper
- Finishing supplies (paint, varnish, or oil)
For those who prefer ready‑made components, the following Amazon products can serve as reliable tools and accessories throughout the build:
- WORX Pegasus Folding Workbench
- CAMMOO Adjustable Workbench
- OLBRUS Adjustable Workbench
- IGERI Workbench
- WEN Workbench
Step 1: Design the Layout and Measure the Wall Space
The first phase involves determining the exact dimensions of the fold‑down surface and the available wall clearance. Measure the width of the wall where the benchtop will be mounted; a typical small workshop provides between 36 and 48 inches of clear space. Record the height from floor to ceiling to ensure the folded‑up position will not interfere with overhead lighting or shelving.
Sketch a simple diagram that includes the tabletop thickness, hinge placement, and any integrated power strip. For a sturdy platform, a 3/4‑in. hardwood top offers a balance of strength and weight. If the workshop requires a higher load capacity, consider the WORX Pegasus Folding Workbench as a reference; its 2‑in. thick steel frame supports up to 500 lb, demonstrating that a robust design is achievable with modest material choices.
When the design is finalized, mark the cut lines on the wood sheet using a straightedge and pencil. Double‑check all measurements before proceeding to the cutting stage.
Step 2: Cut the Tabletop and Frame Components
Secure the hardwood sheet to a stable work surface and set the circular saw to a depth slightly deeper than the material thickness. Make a clean, straight cut along the marked line, producing a tabletop that matches the intended width and depth. Sand the edges to remove splinters and achieve a smooth finish.
Next, cut the steel angle brackets to length. These brackets will form the supporting frame that attaches to the wall. A typical configuration uses two brackets per side, creating a rectangular cradle for the tabletop. The WORX Pegasus Folding Workbench utilizes a similar 2‑in. by 2‑in. steel backbone, illustrating the effectiveness of metal reinforcement for heavy loads.
After cutting, drill pilot holes in the brackets and tabletop to prevent wood splitting when the bolts are installed. Ensure that the holes align precisely with the intended hinge locations.
Step 3: Install Heavy‑Duty Hinges and Folding Mechanism
Attach the heavy‑duty hinges to the back edge of the tabletop. Position the hinges so that the folding axis aligns with the wall studs, providing maximum support. Use carriage bolts, washers, and nuts to secure the hinges through the pre‑drilled pilot holes.
For added stability, the CAMMOO Adjustable Workbench offers a built‑in height‑adjustment system that can be adapted as a locking mechanism for the folded position. Its 2000‑lb load capacity and integrated power strip illustrate how an adjustable platform can double as a secure latch when the bench is raised.
Test the hinge operation by folding the tabletop up and down several times. The motion should be smooth, and the bench should sit flush against the wall when folded up. Install a magnetic catch or a simple latch to keep the bench securely closed during storage.
Step 4: Add Power Access and Optional Storage
Electrical convenience is essential for modern workshops. If the benchtop will host power tools, incorporate a power strip into the design. The OLBRUS Adjustable Workbench includes four ETL‑certified outlets and two USB ports, demonstrating a practical layout for integrating power without clutter.
Mount the power strip beneath the tabletop, securing it with brackets or double‑sided adhesive. Route the cord through a drilled channel that exits near the bottom of the bench, allowing the cord to reach a wall outlet when the bench is in use. Ensure that all electrical components comply with local safety codes.
For users who require tool storage, the IGERI Workbench features a built‑in drawer and storage compartment. Adapt a similar drawer design beneath the benchtop to hold frequently used hand tools, keeping the workspace tidy.
Step 5: Finish, Test Load Capacity, and Install
Apply a protective finish to the tabletop to resist moisture and wear. Choose a clear polyurethane for a natural wood appearance, or a solid‑color paint for a more industrial look. Allow the finish to cure according to the manufacturer’s instructions before loading the bench.
Conduct a load test by placing a known weight on the tabletop and verifying that the hinges and frame remain stable. The WEN Workbench demonstrates that a 48‑inch workbench with integrated outlets can safely support heavy tools when properly anchored.
Finally, mount the frame to the wall studs using lag bolts. Verify that the bench folds down to a thickness of no more than 4‑in., preserving valuable floor space. Once installed, the bench is ready for daily use and can be folded up when the workshop is not in operation.
Tips & Pro Tips
- Use a stud finder to locate wall studs; anchoring directly into studs prevents sagging over time.
- Apply a thin layer of silicone sealant between the tabletop and brackets to reduce vibration.
- Consider adding a removable rubber mat on the work surface for better tool grip and reduced wear.
- If the workshop experiences temperature fluctuations, select a wood species with dimensional stability, such as maple or birch.
- For extra safety, install a secondary latch on the opposite side of the bench to prevent accidental opening.
Troubleshooting
Problem: The bench does not stay level when folded down.
Solution: Verify that the hinges are installed on a perfectly horizontal line. Adjust the bracket height or add shims beneath the frame until the tabletop sits evenly.
Problem: The power strip cord is too short.
Solution: Use a short, heavy‑duty extension cord that can be routed through the same channel, or relocate the bench to a wall outlet that is within reach.
Conclusion
One now possesses a functional, space‑saving fold‑down benchtop that maximizes limited workshop real estate while providing a sturdy, power‑ready work surface. By following the outlined steps, selecting appropriate materials, and optionally integrating the recommended Amazon products, the project can be completed efficiently and safely. The finished bench will enhance productivity, keep tools organized, and preserve floor space for future expansions.
Readers are encouraged to adapt the design to their specific needs, experiment with different finishes, and share their results with the DIY community.
Products Mentioned in This Guide
WORX Pegasus Folding Workbench
Price: See Amazon listing. Rating: See Amazon listing.
Features: 2‑in.×2‑in. steel frame, 31"×25"×32" dimensions, heavy‑load capacity, fast setup, includes 2 clamps and 4 clamp dogs, lightweight portable design.
CAMMOO Adjustable Workbench
Price: See Amazon listing. Rating: See Amazon listing.
Features: 48" length, 2000 lb load capacity, ETL‑certified power strip with 4 outlets and 2 USB ports, height adjustment from 28" to 39", carbon steel frame, solid rubber wood top.
OLBRUS Adjustable Workbench
Price: See Amazon listing. Rating: See Amazon listing.
Features: 48" length, 2000 lb load capacity, built‑in power outlet, hardwood top, suitable for workshop, office, garage, and home.
IGERI Workbench
Price: See Amazon listing. Rating: See Amazon listing.
Features: 39" heavy‑duty workbench, built‑in drawer and storage, small wood top, metal frame, suitable for crafts, 3D printing, and general workshop tasks.
WEN Workbench
Price: See Amazon listing. Rating: See Amazon listing.
Features: 48‑inch workbench, built‑in power outlets and lighting, black industrial finish, ideal for heavy‑duty tasks.
Frequently Asked Questions
What materials are recommended for a sturdy, space‑saving fold‑down benchtop?
Use ¾‑inch plywood or MDF for the work surface, 2×4 lumber for the frame, and metal hinge brackets rated for the intended load.
Which folding hardware works best for a DIY benchtop that can support heavy tools?
Heavy‑duty piano hinges or continuous folding hinges combined with locking brackets provide strong, reliable support.
How can I integrate power access without compromising the benchtop’s foldability?
Install a recessed power strip or a wall‑mounted outlet with a short cord that runs through a drilled hole in the bench, then seal the opening with a rubber grommet.
What basic carpentry tools are needed to complete the project over a weekend?
A circular saw or table saw, drill, screwdriver set, measuring tape, level, and a hammer are sufficient for most builds.
Can I add storage drawers to the fold‑down benchtop, and how?
Yes—attach shallow drawer boxes to the underside of the bench using drawer slides that fold flat when the benchtop is lowered.